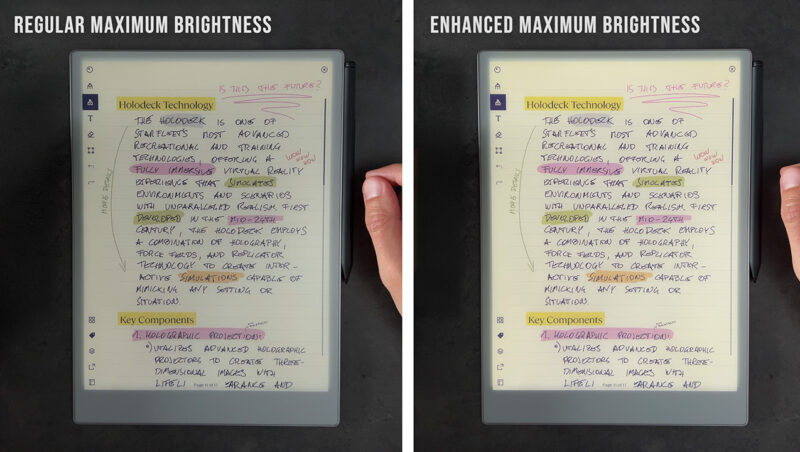
Remarkable Paper Pro Hack for Brighter Frontlight | TUTORIAL

The Remarkable Paper Pro has garnered attention for its many strengths, but one area that left me a bit underwhelmed is the frontlight.
Its frontlight, capped at around 4 nits, doesn’t do much to improve readability, especially during the day. To put this into perspective, the Kindle Scribe offers a maximum brightness of 125 nits. I’m not suggesting that Remarkable should have gone that bright, but a little more illumination would have been nice.
As it turns out, the Remarkable Paper Pro’s hardware can actually support a higher brightness level than the default 4 nits. By using a simple SSH tweak, you can increase the maximum brightness, making it more usable.
This quick hack bumps the brightness up to around 8 nits, which may not sound like a huge leap, but according to Steven’s power law for reflective surfaces, it translates to about 2.5 times the perceived brightness. The result is a screen that looks brighter than you might expect from this numerical increase.
While this modification still doesn’t put the Remarkable on par with other devices in terms of brightness, the improvement is noticeable and makes the tablet more functional for daytime use.
Before we get into the details, though, it’s important to mention that performing this hack is entirely at your own risk. There’s a possibility it could cause issues down the road and may even void your warranty.
The credit for discovering this tweak goes to some resourceful users in the Remarkable Tablet subreddit, who have generously shared the steps.
How to Increase the Remarkable Paper Pro’s Brightness
If you’re ready to give your Remarkable a brightness boost, here’s how you can do it. The process consists of three steps: enabling developer mode, connecting to the device via SSH, and applying the necessary changes.
All in all, the entire process should take no more than 10 minutes.
1. Enable Developer Mode
The first thing you need to do is enable developer mode on your Remarkable Paper Pro. This mode grants you access to the underlying system, but keep in mind that switching to developer mode will reset your device and delete everything on it. Be sure to sync any important data to your Remarkable account before proceeding.
For more information on developer mode, check out the Remarkable support article here.
2. Connect to Your Remarkable via SSH
Once your device reboots in developer mode, connect it to your PC using a USB-C cable. If you’re on Windows 10 or 11, the built-in SSH client will come in handy—no need for additional software. For Linux and macOS users, the SSH client is also already built in. I’ll be guiding you through the process on Windows 11.
To begin, open the Command Prompt by pressing Windows + R and typing “CMD.” Once the command prompt opens, use the following command to connect to your Paper Pro via SSH:
ssh root@10.11.99.1You’ll need to accept the device’s fingerprint and enter the root password, which can be found by navigating to the Settings > About section on your Remarkable. The root password is located under Copyrights and Licenses, in the GPL Compliance section.
3. Implement the Brightness Hack
Now that you’re connected via SSH, it’s time to enable the brighter frontlight.
Turn up the frontlight on your device, then enter the commands listed below. You should see the change immediately.
cat /sys/class/backlight/rm_frontlight/max_brightness > /sys/class/backlight/rm_frontlight/brightness
echo yes > /sys/class/backlight/rm_frontlight/linear_mapping
If you don’t like the new brightness level, a simple reboot will revert your device to its default settings. The developer mode will still be active though and needs to be disabled through the recovery mode.
But if you’re happy with the adjustment, you can make the change semi-permanent by creating a systemd service. This will ensure the settings are applied automatically every time your Remarkable Paper Pro starts up. Again, the commands to set this up are at the end of the article.
umount -l /etc
mount -o remount,rw /

tee /etc/systemd/system/tweak-brightness-slider.service > /dev/null
<<EOF
[Unit]
Description=Set linear_mapping to 'yes' for backlight
After=multi-user.target

[Service]
Type=oneshot
ExecStart=/bin/sh -c 'echo yes > /sys/class/backlight/rm_frontlight/linear_mapping'
ExecStartPost=/bin/sh -c 'cat /sys/class/backlight/rm_frontlight/max_brightness > /sys/class/backlight/rm_frontlight/brightness'

[Install]
WantedBy=multi-user.target
EOF

systemctl daemon-reload
systemctl enable --now tweak-brightness-slider.service
And that’s it! Once you’ve rebooted your device, the brighter frontlight should be in effect. You’ll notice that the frontlight starts at its original level and takes a few moments to adjust to the brighter setting after booting up.
My Experience with the Brightness Hack
Although the brightness is still quite low compared to other E-Ink devices, it’s much more practical during the day with the hack. The brightness scaling also feels more intuitive now—gone are the super dim first two levels, and the colors on the display look more vibrant when the frontlight is turned all the way up.
One thing that surprised me is that Remarkable chose to limit the frontlight through software. From my experience, the increased brightness doesn’t seem to drain the battery noticeably faster, and I doubt that the heat generated by the LEDs is a concern, especially since the tablet is designed to be used outdoors. But that’s just my personal opinion, so take that with a grain of salt.
That said, as with any hack, there’s always a chance it could impact the device’s longevity, and it will possibly void your warranty. So proceed with caution if you decide to try this out.