20 Must-Know Kindle Scribe Tips & Tricks
If you’ve recently gotten your hands on a Kindle Scribe and are eager to unlock its full potential, you’re in the right place. Let’s dive into some insider tips to enhance your Scribe experience.
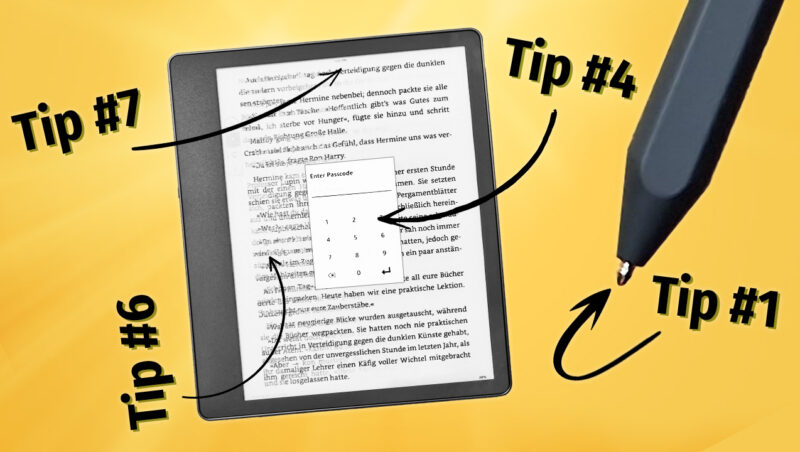
Titanium Pen Tips
Let’s kick things off with a tip about the pen tips. The Kindle Scribe comes with plastic ones, and you’ll find a few extras in the box because they wear out. In my case, I was replacing them almost every four weeks, though your experience might vary based on how much pressure you put on the tip.
To cut down on replacements and save some cash, I switched to titanium nibs. These are metal and incredibly durable — I haven’t had to replace mine at all. The writing feel changes slightly, feeling less pencil-like, and they’re a tad noisier against the screen. However, I still enjoy that gratifying textured feedback. And don’t worry, all the essential features like pressure sensitivity and tilt detection also work.
Initially, I was a bit anxious about the metal tip damaging my Kindle Scribe’s screen. But I’ve been using it for several weeks now without a single mark to show for it.* So, when you’ve used up the included plastic nibs, consider moving to titanium if you want to stop swapping out the pen tips as often and save money on those.
*Note: While I’ve been using my device without a screen protector and haven’t run into any issues, if you’re worried about screen wear or scratches, opting for a screen protector could offer added safety. Regular inspection of your screen’s health as a preventive step is advisable as a safeguard in any case.
Set Your Book Cover as the Standby Image
The Kindle Scribe introduces some neat screensaver options. But if you’re like me and prefer seeing the cover of your current read when the device is on standby, there’s a simple tweak for that.
Dive into the device’s options, look for the “Display Cover” setting, and activate it.
Just note, this feature works exclusively with books, not notebooks.
Utilize the Warm Light Schedule
The ereader comes equipped with light sensors that automatically adjust the screen’s brightness to your environment. Activating it is a breeze—head over to the control center, find “Auto brightness,” and tick the box to enable.
Moreover, you can schedule the screen’s color temperature to automatically adjust based on the time of day, enhancing your reading experience, especially at night.
Secure Your Device with a Passcode
Considering the Scribe’s notetaking capabilities, setting up a passcode can be a wise decision if you take sensitive or personal notes. This adds an extra layer of security.
- Head to the device’s settings.
- Select “Device Options.”
- Choose the “Device Passcode” setting and
- Enter the PIN you want to use.
This setup does mean you’ll need to enter the passcode each time you turn on the device, trading a bit of convenience for a significant security boost.
Opt Out of Data Collection
Like many tech devices, the Kindle Scribe collects usage data. If you’re not keen on sharing this information, you can easily opt out.
- Go to the device’s settings.
- Select “Device Options.”
- Then, navigate to “Advanced Options.”
- In the Advanced Options, tap on the “Privacy” menu item.
- And here, you’ll find the option to disable personal data collection. Select ‘disable’ to deactivate it.
Enable Page Turn Animation
The Kindle Scribe features a subtle page-turn animation that mimics a wave-like motion, adding a touch of realism to your digital reading experience.
- Open a book on your Kindle Scribe.
- Go to the reading settings within the book.
- In the reading settings, look for the page turn animation option and enable it.
It’s a minor detail that enriches the reading experience with a more physical book feel.
Keep an Eye on Time with a Clock Display
Ever find yourself so engrossed in a book that you lose track of time? The Scribe can display a clock at the top of your page while you read.
How to enable this:
- Open up a book and the reading settings.
- Next, hit ‘More’.
- Find the option to show the clock, and turn it on.
It’s a handy feature that lets you monitor the time without interrupting your reading flow.
Experiment with Two Columns Reading Mode
The Scribe’s large screen is perfect for a two-column reading mode, offering a more traditional book-like experience.
To switch to this view, adjust the orientation to landscape in the reading settings and select the 2-column layout.
This setup is particularly enjoyable for lengthy reading sessions, providing a comfortable and familiar layout.
Expand Your Vocabulary
The Kindle Scribe’s Vocabulary Builder is a fantastic tool for anyone looking to expand their vocabulary. Whenever you look up a word in the dictionary, it’s added to a list. Later, you can review these words using virtual flashcards.
To access Vocabulary Builder, open any book, navigate to the menu, and you’ll find it there.
The flashcard test lets you review each word within its original context, and if you’re confident in your recall, you can mark it as ‘mastered’ to remove it from your review list.
Simplify Reading with Word Wise
For those challenging reads, Word Wise is a lifesaver. It offers short explanations for difficult words right within the text, so you can keep reading smoothly without pausing to look up words.
To enable this feature, open the reading menu, activate “Word Wise,” and adjust the difficulty level as needed.
This tool is invaluable for both learning new vocabulary and enhancing your reading pace.
Customize the Pen’s Shortcut Button
If you opted for the Premium Pen, you’ll appreciate the ability to customize the shortcut button on the stylus. This customization allows you to tailor the pen’s functionality to your specific needs.
To set this up, go to the device’s settings, find pen settings, and choose your preferred function for the shortcut button.
If you find yourself accidentally activating the feature, there’s also an option to disable it completely.
Save Notebook Pages as Images Locally
There might be times when you want to save a notebook page as an image without going through the hassle of emailing it.
A simple workaround is to take a screenshot by tapping the top right and bottom left corners of the screen simultaneously.
This action saves the screenshot as a PNG file in the device’s internal storage, which you can then transfer to a computer via USB. It’s a quick and efficient method for saving notes, sketches, or any screen content.
Note-Taking on PDFs
One of the more controversial features at the Kindle Scribe’s launch was its ability to take notes directly on PDF pages only when those PDFs were pre-processed. So this functionality is exclusive to processed PDFs, not those transferred via USB.
To enable note-taking on a PDF, visit the Send-to-Kindle website, upload the PDF while logged into your Amazon account, and it will be sent directly to your Kindle Scribe.
This process makes the PDF ready for direct note-taking.
Tracing Images and Sketching
For the artists out there, the Kindle Scribe offers a great feature to trace images. Using note-taking-capable PDF files, you can trace images directly on the device.
Simply open the PDF and start drawing over the page.
Afterwards, use the selection tool to transfer your sketch to a notebook for further refinement.
Move the Writing Toolbar
Adjusting the writing toolbar’s position can greatly enhance your writing experience. While you can’t place it just anywhere, you do have the option to move it from the left side to the right, catering to both left-handed users and personal preferences.
To adjust, tap the three dots at the bottom of the toolbar and select the option to move it.
Hide the Writing Toolbar for a Cleaner Reading Experience
If you prefer a distraction-free reading environment, especially when you’re not taking notes, you can hide the writing toolbar.
Access the options menu, tap the menu on the right, and choose to hide the toolbar.
This feature ensures a more immersive reading experience without unnecessary distractions.
Efficiently Manage Notebook Pages
The latest software update introduces the ability to select multiple notebook pages simultaneously, streamlining the process of exporting, moving, or deleting pages.
To use this feature, open a notebook, tap the overview icon, and either tap and hold a page or use the “select” button to choose multiple pages for management.
Search Handwritten Notes
Another recent addition allows for searching within your handwritten notes.
When exporting a notebook, opt to convert the handwriting to typed text, creating a searchable PDF.
This functionality enhances your ability to locate specific notes quickly and efficiently.
Access Your Notebooks Online
Same as with the previous tip, this one isn’t directly related to the Kindle Scribe itself, but to the Kindle website.
There’s a website where you can access all of your notebooks directly from your computer’s web browser: https://read.amazon.com/kindle-notebook?ref_=neo_mm_yn_na_kfa
There’s just one slight issue with it: It’s not an official feature right now and Amazon seems to be working on it on and off. So the page isn’t consistently available, which is why I can’t show it in this video. So don’t rely on accessing your notebooks that way.
I still decided to mention it nonetheless, even though it’s currently just redirecting to the Kindle Scribe’s FAQ page, so maybe when you’re watching this video it’s available again.
Manually Update Your Kindle Scribe
If your Kindle Scribe is connected to a WiFi-network that can access the web it will update automatically from time to time. This is important, because those updates will not only fix problems, but often bring new features. In fact, the Kindle Scribe is quite a bit different from when it was launched thanks to those updates.
But sometimes, it can take a while to get an update, because Amazon is typically rolling out new software over a couple of weeks. If you don’t want to wait, you can simply download a new software version yourself and update it manually. You have to copy the download file onto the internal storage of the Kindle Scribe, then go to the settings on the device and start the update process from the menu right here.